mizzeliz – working for you.. Healthy Foods — Buttons — Gardening

Category Archives: Recipes

Delicious recipes I have created

CREAMY BROCCOLI SOUP

No dairy used here!

  • 1/3 cup White Bean Flour :::    I grind my own
  • n1/4 tsp Garlic salt (Premium) ::: I would use a few cloves of garlic and probably No Salt or a Half Salt.
  • 1/2 tsp Basil (Imported) ::: or Fresh from my Garden
  • 2 Tb Vegetable Soup Base ::: I have some home made in the freezer..
  • 1 cup Finely Chopped Celery ::: or Celeriac
  • 3 cups Boiling Water
  • 1/2 cup Onion, chopped
  • 4 cups Fresh Broccoli, chopped ::: fresh or frozen

Directions

In a large saucepan combine all but the bean flour. Bring to a boil, then reduce heat and simmer covered for 15 minutes or until broccoli is tender. In a blender, blend 1/3 of the soup mixture and bean flour at a time until smooth. Return to saucepan and cook an additional 5 minutes.

Makes 3 Servings.

Modified Garlic Soup Recipe

I will make this as soon as I get some more garlic…

Serves 4

26 garlic cloves (unpeeled)
2 tablespoons olive oil
2 tablespoons (1/4 stick) organic butter (grass fed)
1/2 teaspoon cayenne powder
1/2 cup fresh ginger
2 1/4 cups sliced onions
1 1/2 teaspoons chopped fresh thyme
26 garlic cloves, peeled
1/2 cup coconut milk
3 1/2 cups organic vegetable broth
4 lemon wedges

Preheat oven to 350F. Place 26 garlic cloves in small glass baking dish. Add 2 tablespoons olive oil and sprinkle with sea salt and toss to coat. Cover baking dish tightly with foil and bake until garlic is golden brown and tender, about 45 minutes. Cool. Squeeze garlic between fingertips to release cloves. Transfer cloves to small bowl.

Melt butter in heavy large saucepan over medium-high heat. Add onions, thyme, ginger and cayenne powder and cook until onions are translucent, about 6 minutes. Add roasted garlic and 26 raw garlic cloves and cook 3 minutes. Add vegetable broth; cover and simmer until garlic is very tender, about 20 minutes. Working in batches, puree soup in blender until smooth. Return soup to saucepan; add coconut milk and bring to simmer. Season with sea salt and pepper for flavour.

Squeeze juice of 1 lemon wedge into each bowl and serve.

Can be prepared 1 day ahead. Cover and refrigerate. Rewarm over medium heat, stirring occasionally.

If garlic were found to be a wonder drug, consumers could simply buy it in the supermarket for 30p a bulb or grow their own in the garden.

Nevertheless, garlic has a long and proud tradition as a medicine. The Ancient Egyptians recommended it for 22 ailments. In a papyrus dated 1500BC, the labourers who built the pyramids ate it to increase their stamina and keep them healthy.

The Ancient Greeks advocated garlic for everything from curing infections, and lung and blood disorders to healing insect bites and even treating leprosy.

The Romans fed it to soldiers and sailors to improve their endurance. Dioscorides, the personal physician to Emperor Nero, wrote a five-volume treatise extolling its virtues.

One of the most interesting of the recent findings is that garlic increases the overall antioxidant levels of the body. Scientifically known as Allium sativa, garlic has been famous throughout history for its ability to fight off viruses and bacteria. Louis Pasteur noted in 1858 that bacteria died when they were doused with garlic. From the Middle Ages on, garlic has been used to treat wounds, being ground or sliced and applied directly to wounds to inhibit the spread of infection. The Russians refer to garlic as Russian penicillin.

More recently, researchers have unearthed evidence to show garlic may help us to stay hale and hearty in a number of ways.

garlic

Last June, nutrition scientists at the University of Florida found eating garlic can boost the number of T-cells in the bloodstream. These play a vital role in strengthening our immune systems and fighting viruses.

And pharmacologists at the University of California found that allicin — the active ingredient in garlic that contributes to bad breath — is an infection-killer.

Allicin also makes our blood vessels dilate, improving blood flow and helping to tackle cardiovascular problems such as high cholesterol.

An Australian study of 80 patients published last week in the European Journal of Clinical Nutrition reported that diets high in garlic may reduce high blood pressure.

In 2007, dentists in Brazil found that gargling with garlic water (made by steeping crushed garlic cloves in warm, but not boiling, water) can kill the germs that cause tooth decay and gum disease.

But they hit a snag: the volunteers refused to continue the experiment, complaining that the garlic gargle made them feel sick. Looking at the garlic soup recipe certainly made me feel queasy. Still, it gave me an excuse to use up my ample supply of garlic.

Though last year’s awful weather caused crop failures on my allotment, I enjoyed a bumper harvest of garlic.

Among its many other virtues, garlic kills slugs and snails. Researchers from the University of Newcastle believe it contains oils that may cripple the nervous systems of these slimy creatures.

There are two schools of thought as to the best way of preparing garlic to make the most of its medicinal qualities.

Argentinian investigators found it releases its allicin-type compounds when you bake the cloves, while scientists at South Carolina Medical University believe peeling garlic and letting it sit uncovered for 15 minutes produces the highest levels of compounds to fight infection.

So you can simply peel half of the garlic cloves and roast the other half with the kitchen door tightly closed (to stop the pong permeating throughout the house).

After an hour-and-a-quarter’s industrious soup-making, sprinkle lemon juice over a bowl of steaming, grey gloop and tuck in.

The heady aroma certainly revs up the appetite and the first spoonful does not disappoint. Delicious as it is, however, one large bowl of home-made soup is a more than ample meal.

As for the soup’s cold-preventing powers, only time will tell. Regular bowlfuls may very well keep me free of winter ailments, thanks to the virus-killing compounds they contain.

Or it could just be that my nuclear-strength garlic breath will keep everyone who is infectious far out of sneezing range for months to come.

Source:

preventdisease.com

A recent and significant finding from Washington State University shows that garlic is 100 times more effective than two popular antibiotics at fighting disease causing bacteria commonly responsible for food borne illness.

When the garlic is crushed, alliin becomes allicin. Research shows that allicin helps lower cholesterol and blood pressure and also helps prevents blood clots. Garlic can also reduce the risk of developing atherosclerosis (hardening of the arteries). Compounds in this familiar bulb kill many organisms, including bacteria and viruses that cause earaches, flu and colds. Research indicates that garlic is also effective against digestive ailments and diarrhea. What’s more, further studies suggest that this common and familiar herb may help prevent the onset of cancers.

‘This chemical has been known for a long time for its anti-bacterial and anti-fungal powers,’ says Helen Bond, a Derbyshire-based consultant dietitian and spokeswoman for the British Dietetic Association.

‘Because of this, people assume it is going to boost their immune systems. Lots of people are simply mashing up garlic, mixing it with olive oil and spreading it on bread.

‘But how or whether it may actually work has still not been proven categorically.’

Indeed, scientists remain divided on garlic’s ability to combat colds and flu. Last March, a major investigation by the respected global research organisation, the Cochrane Database, found that increasing your garlic intake during winter can cut the duration of cold symptoms — from five-and-a-half days to four-and-a-half.

But the report, which amalgamated all previous scientific studies on garlic, said it could not draw solid conclusions because there is a lack of large-scale, authoritative research.

The problem is that pharmaceutical companies are not interested in running huge, expensive trials — as they would with promising new drug compounds — because there is nothing in garlic that they can patent, package and sell at a profit.

garlic_cloves3ef


Sausage Minestrone Soup… Great for a cool winter’s night…

1 qt low sodium chicken broth

2 Cups water

2 Tbsp Tomato Paste

1  chopped onion..

2-6 cloves of chopped garlic depending on your taste..

1 cup carrots or parsnips chopped small..

1 can (14 oz) Cannellini beans..

1/2 cups chopped celery or Celeriac..

1  can 28 oz diced tomatoes..

1 Bay leaf..

1/2 tsp dried Thyme..

1/2 dried Basil..

1 LB Hot or mild sausage  cut up and casings removed or use bulk sausage..

2 Cups cut up Kale, Swiss Chard, or Spinach..

2 cups Cooked  Orecchiette, Orzo ,  Rice,  Quinoa, etc.. Pick one or combine two..

In a slow cooker combine chicken broth, water, tomato paste, onion, garlic, celery, cannellini beans, salt, tomatoes, Bay leaf, thyme, and basil.

In a nonstick skillet saute sausage breaking it into small pieces until browned, about 5 min. Drain on a paper towel lined paper plate. Then add to the slow cooker. Cover and cook on high 4 hours. Stir in Kale, Swiss Chard, or Spinach, and whatever pasta rice, or Quinoa you have chosen..  makes about 12 cups…

You mat add whatever other spices you desire and or more  chopped vegetables. Summer squash, zucchini, pumpkin, other squash,  cut green beans, or a can of chic peas  to taste..  You may need more water or broth if you add more vegetables.. Also cook the pasta, rice, or Quinoa in a vegetable or chicken broth.. I make broth ahead and store it in the freezer until I need it…

Serve this with bread dipped in spiced Olive Oil, or your favorite crackers…


Honey Mustard Chicken & Roasted Potatoes : from ‘High Protein Foods’

Ingredients:
1 whole chicken, defrosted
1/3 cup grainy mustard
1/3 cup honey
1/3 cup olive oil
1/4 cup butter, softened

3 lbs red potatoes, chopped into 1/2 in. pieces
1 large yellow onion, chopped
1/2 cup olive oil
1/2 Tbs salt
1/2 Tbs black pepper

Directions:
Put whole chicken in slow cooker. In a small bowl, whisk together mustard, honey, olive oil, and butter, and pour over chicken. Set slow cooker on HIGH for 6 hours or LOW for 8 hours. Remove from slow cooker and pour some of the leftover juices over the chicken to serve.

Preheat oven to 425 degrees. Grease a 9×13 inch baking dish. Put potatoes, onions, olive oil, salt, and pepper into baking dish and stir together. Bake for about an hour, or until potatoes are golden brown and crispy, stirring every 15 minutes.

Serves 4.

Photo: Honey Mustard Chicken & Roasted Potatoes</p>
<p>Ingredients:<br />
1 whole chicken, defrosted<br />
1/3 cup grainy mustard<br />
1/3 cup honey<br />
1/3 cup olive oil<br />
1/4 cup butter, softened</p>
<p>3 lbs red potatoes, chopped into 1/2 in. pieces<br />
1 large yellow onion, chopped<br />
1/2 cup olive oil<br />
1/2 Tbs salt<br />
1/2 Tbs black pepper</p>
<p>Directions:<br />
Put whole chicken in slow cooker. In a small bowl, whisk together mustard, honey, olive oil, and butter, and pour over chicken. Set slow cooker on HIGH for 6 hours or LOW for 8 hours. Remove from slow cooker and pour some of the leftover juices over the chicken to serve. </p>
<p>Preheat oven to 425 degrees. Grease a 9x13 inch baking dish. Put potatoes, onions, olive oil, salt, and pepper into baking dish and stir together.  Bake for about an hour, or until potatoes are golden brown and crispy, stirring every 15 minutes. </p>
<p>Serves 4.

Lasagna Soup: from ‘High Protein Foods’s’ see note for pasta Free version

For the soup:
2 tsp. olive oil
1-1/2 lbs. Italian sausage
3 c. chopped onions
4 garlic cloves, minced
2 tsp. dried oregano
1/2 tsp. crushed red pepper flakes
2 T. tomato paste
1 28-oz. can fire roasted diced tomatoes
2 bay leaves
6 c. chicken stock
8 oz. mafalda or fusilli pasta
1/2 c. finely chopped fresh basil leaves
salt and freshly ground black pepper, to taste

for the cheesy yum:
8 oz. ricotta
1/2 c. grated Parmesan cheese
1/4 tsp. salt
pinch of freshly ground pepper
additional cheesy yum:

2 c. shredded mozzarella cheese

Heat olive oil in a large pot over medium heat. Add sausage, breaking up into bite sized pieces, and brown for about 5 minutes. Add onions and cook until softened, about 6 minutes. Add garlic, oregano, and red pepper flakes. Cook for 1 minute. Add tomato paste and stir well to incorporate. Cook for 3 to 4 minutes, or until the tomato paste turns a rusty brown color.

Add diced tomatoes, bay leaves, and chicken stock. Stir to combine. Bring to a boil and then reduce heat and simmer for 30 minutes. Add uncooked pasta and cook until al dente. Do not over cook or let soup simmer for a long period of time at this point, as the pasta will get mushy and absorb all the soup broth. You may even want to consider cooking the noodles separately, and then adding some to individual bowls before ladling the soup over them. This would be an especially smart move if you are anticipating any leftovers. Right before serving, stir in the basil and season to taste with salt and freshly ground black pepper.

While the pasta is cooking, prepare the cheesy yum. In a small bowl, combine the ricotta, Parmesan, salt, and pepper.

To serve, place a dollop of the cheesy yum in each soup bowl, sprinkle some of the mozzarella on top and ladle the hot soup over the cheese.

If you want a pasta free recipe you could slices if summer squash and/or zucchini and a couple of tablespoons of Cannellini Bean flour or a can of cooked Cannellini beans(do not drain)..

Ridiculously Easy Homemade Dill Pickles

Ridiculously Easy Homemade Dill Pickles —-                                                                          from  Primally Inspired!

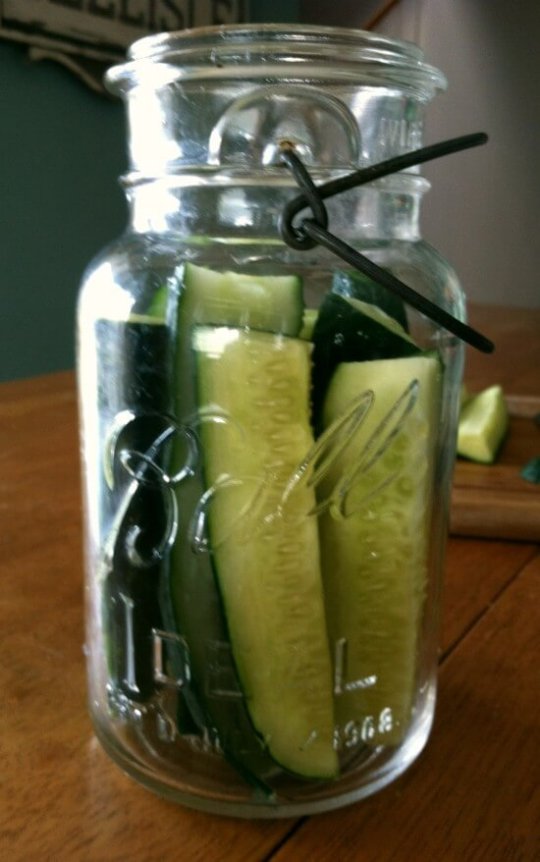
PUT THEM IN YOUR JAR The recipe calls for a 1 quart jar. You can use any size jar, though! Pack your cucumbers in tight! I can usually pack 1 to 1 1/2 regular large cucumbers in one quart sized jar.

At my farmer’s market, there’s an amazing pickle stand with about 12 different kinds of delicious homemade pickles. They have garlic pickles, super dilly dill pickles, sweet pickles, spicy pickles and all the flavors in between. I love my pickles so the pickle stand was a weekly must stop for me.

…..Until I realized how ridiculously easy it was to make my own pickles. I’m talking really, really easy. I can’t stress to you how simple this is. Like so easy I could kick myself for spending so much of my hard earned money at the pickle stand for years and years when I could have been making them myself all this time. No canning, no special equipment – just water, salt, spices and your cucumbers! Easy peasy.

This will literally take you 10 minutes tops and in 3-7 days, you’ll have the best homemade pickles in town. I like to make a bunch of jars of pickles at one time while I have all the ingredients out. I can knock out a couple jars of pickles in no time flat.

The recipe down below is a basic recipe for old fashioned dill pickles and it’s my very favorite, cut right out of a falling apart old, old church recipe book that I think was my grandmother’s (best kind of recipes, right?!).  But, I also like to experiment with the spices, add some hot peppers to one jar, add extra garlic to another jar – you get the idea.

Oh! I almost forgot to tell you about the second best part of this recipe – or maybe it’s the first best part, I can’t decide between this and how easy they are. These pickles are lacto-fermented, which means they contain the really good, beneficial bacteria (probiotics!). So eating these will help heal our gut lining, provide anti-inflammatory benefits, give us better digestion, strengthen our immune system, and turn us into super heroes. Okay maybe not so much the last part, but I sure feel like a super hero when everyone who eats these pickles tells me how amazing they are :)

Ridiculously Easy Homemade Dill Pickles

Makes 1 quart sized jar

Ingredients:

cucumbers

2 cloves of garlic

2 sprigs of fresh dill (the flowered heads of the dill taste the best for these pickles, so use them if you can get them)

½ tsp coriander seeds

¼ tsp mustard seeds

¼ tsp whole peppercorns

1/8 tsp red pepper flakes

2 cups of water

1 T sea salt

optional ingredients:

handful of fresh grape, raspberry, oak, blackberry or cherry leaves (these types of leaves supply tannins, which help keep the pickles crispy and crunchy)

onion or a clean rock piece to weigh the cucumbers down and keep them submerged in the brine

DIRECTIONS:

Decide what size pickles you would like and cut your cucumbers into your desired size. Keep in mind that sliced cucumbers will ferment faster than whole cucumbers. Pack your cucumber slices into your jar. Pack them tight! Add the spices on top. Mix the water and sea salt together until the salt is dissolved. Pour your water/salt over the pickles. Leave about an inch of space between the water and the top of the jar. All the cucumbers must be submerged in the water. If you are having trouble getting them totally submerged, you may need to add a “weight” to the jar to keep them submerged. I like to add a big chunk of onion. Not only does the onion give great flavor, but it does a good job of keeping the cucumbers under the water. You may also add a clean rock if you don’t want to use an onion.

Put a top on your jar and leave on the counter for 3 days. Test a pickle on day 3. If it is to your liking, put the jar in the fridge. This stops the fermentation process. You won’t have to worry about keeping the pickles submerged once they go in the fridge. If the pickles are not to your liking, keep testing them each day. You know they are perfect when they taste great to you and they still have their crunch. If you leave them out on the counter too long, they will lose their crunch and get really soft so it’s important to put them in the fridge when they are to your liking. No one likes a limp pickle ;)

If you start to see a white film or mold on top, just skim it off. It is harmless (just yeast!), but it will impact the taste of the pickles, so you want to skim it off as soon as you see it.

Your pickles will keep for 6 months in the fridge. Enjoy!

Step by step picture instructions:

CHOOSE YOUR CUCUMBERS Pickling cucumbers are the best for making pickles, but any cucumbers will work. I use plain old regular cucumbers most of the time because I can get them easier. I will say that  regular cucumbers have more seeds and sometimes don't get as crunchy as the pickling cucumbers. Mini cucumbers are also great for pickles!

CHOOSE YOUR CUCUMBERS
Pickling cucumbers are the best for making pickles, but any cucumbers will work. I use plain old regular cucumbers most of the time because I can get them easier. I will say that regular cucumbers have more seeds and sometimes don’t get as crunchy as the pickling cucumbers. Mini cucumbers are also great for pickles!

CUT YOUR CUCUMBERS INTO YOUR DESIRED SIZE You can leave the cucumbers whole, but they take longer to ferment. You can cut them in halves or in spears or even cut them in coins. The smaller you cut them, the shorter the fermentation process.

CUT YOUR CUCUMBERS INTO YOUR DESIRED SIZE
You can leave the cucumbers whole, but they take longer to ferment. You can cut them in halves or in spears or even cut them in coins. The smaller you cut them, the shorter the fermentation process.

PUT THEM IN YOUR JAR The recipe calls for a 1 quart jar. You can use any size jar, though! Pack your cucumbers in tight! I can usually pack 1 to 1 1/2 regular large cucumbers in one quart sized jar.

PUT THEM IN YOUR JAR
The recipe calls for a 1 quart jar. You can use any size jar, though! Pack your cucumbers in tight! I can usually pack 1 to 1 1/2 regular large cucumbers in one quart sized jar.

MEASURE YOUR SPICES Some tips on spices: The flowered dill heads taste the best, but use what you can find. I only had the sprigs of dill this time so that's what I used. I also ran out of coriander seeds, so ground coriander it is this time around! Get creative with your spices if you are feeling brave. Want your pickles extra hot? Add some more red pepper flakes. Want them super garlicy? Add some more garlic. Have fun with creating your own homemade pickle creations!

MEASURE YOUR SPICES
Some tips on spices: The flowered dill heads taste the best, but use what you can find. I only had the sprigs of dill this time so that’s what I used. I also ran out of coriander seeds, so ground coriander it is this time around! Get creative with your spices if you are feeling brave. Want your pickles extra hot? Add some more red pepper flakes. Want them super garlicy? Add some more garlic. Have fun with creating your own homemade pickle creations!

ADD THE SPICES IN YOUR JAR Once you figure out your spices, add them right on top of the cucumbers.

ADD THE SPICES IN YOUR JAR
Once you figure out your spices, add them right on top of the cucumbers.


MIX YOUR WATER AND SALT AND ADD IT TO YOUR JAR You will need 2 cups of water and 1 tablespoon of sea salt for every quart. If your jar is bigger, just make another 2 cups water/1 T sea salt mix and add it to your jar. You want to completely cover the cucumbers but make sure to leave a one inch head space so the gases can release in the fermentation process. Your cucumbers MUST be submerged at all times during the fermentation process. If they are not staying down in the brine, you will need to "weigh" them down. If this happens, I like to use a cut onion to weigh them down. The onion gives great flavor and does a really good job of keeping everything submerged in the water. You may also use a clean rock.

MIX YOUR WATER AND SALT AND ADD IT TO YOUR JAR
You will need 2 cups of water and 1 tablespoon of sea salt for every quart. If your jar is bigger, just make another 2 cups water/1 T sea salt mix and add it to your jar. You want to completely cover the cucumbers but make sure to leave a one inch head space so the gases can release in the fermentation process. Your cucumbers MUST be submerged at all times during the fermentation process. If they are not staying down in the brine, you will need to “weigh” them down. If this happens, I like to use a cut onion to weigh them down. The onion gives great flavor and does a really good job of keeping everything submerged in the water. You may also use a clean rock. Once the pickles are submerged in the brine, put the lid on the jar and leave it on your counter. If you see a white film or mold develop on top, open the jar and skim it off.  This is harmless (it’s just yeast!), but it can impact the flavor of the pickles so skim it off as soon as you can if you see it.


TEST YOUR PICKLES On day 3, open your jar and taste test a pickle. If it tastes great and is crunchy, then it's done and you need to put the jar in the fridge. If the pickles aren't ready, put the lid back on and try again the next day. Keep testing the pickles everyday until they taste great to you - this takes between 3 and 7 days. If your house is warm, they will be ready on the lower end of the spectrum. If your house is cool, they will take longer.  Also, once they are to your liking, make sure to put them in the fridge right away so the fermentation process halts. Remember you want your pickles to taste great and still be crunchy. If you leave them out on the counter for too long, the pickles will get soggy and limp - and no one likes a limp pickle ;)

TEST YOUR PICKLES
On day 3, open your jar and taste test a pickle. If it tastes great and is crunchy, then it’s done and you need to put the jar in the fridge. If the pickles aren’t ready, put the lid back on and try again the next day. Keep testing the pickles everyday until they taste great to you – this takes between 3 and 7 days. If your house is warm, they will be ready on the lower end of the spectrum. If your house is cool, they will take longer.
Also, once they are to your liking, make sure to put them in the fridge right away so the fermentation process halts. Remember you want your pickles to taste great and still be crunchy. If you leave them out on the counter for too long, the pickles will get soggy and limp – and no one likes a limp pickle ;) Once the pickles are in the fridge, there is no need to keep them submerged in the water. They will keep for 6 months in the fridge. Enjoy your homemade pickles!

Root manoeuvres: Hugh Fearnley-Whittingstall’s celeriac recipes

It may not be much of a looker, but celeriac is one of the most versatile of all winter veg. In fact, it’s my favorite root of all time.

I’m shining the spotlight on another vegetable that is perhaps even more unprepossessing, with knobbly, knotted looks that only a mother could love – or a cook who has unearthed its inner beauty. I’m going to go out on a limb here and say that celeriac might just be my favourite root of all time. It’s nothing less than a winter wonder.

For starters, the versatility of this vegetable is incredible. Look at this week’s recipes: a crunchy, vibrant raw salad, a tummy-warming gratin and – wait for it – an unforgettable ice-cream! And I didn’t have room for a soup, a mash, a slaw or a curry… Not even the potato has such range. Next among celeriac’s under-appreciated star qualities is its fine texture – delicately crisp but still yielding when raw, tender as butter when boiled or baked, wonderfully velvety but never gluey when mashed or pureed.

But what it all comes down to most is the flavour. Celeriac is closely related to celery, a vegetable that’s vital for giving body and depth to everything from stocks and soups to salads. Both contain compounds known as phthalides (great Scrabble word) that have been shown to have an almost magical ability to enhance the flavours of other ingredients, as well as terpenes, which contribute citrussy, resinous notes. But where celery’s flavour is assertive, celeriac’s is mellow. Celery has a slightly harsh edge, but celeriac is more complex and sophisticated: nutty and earthy, yet highly aromatic. Among its many notes, it even has a touch of the oyster about it – and that’s pretty sexy. Sexy, but comforting. Whether used alone or in combination with other ingredients, celeriac is a warm, voluptuous, creamy hug of a vegetable.

A celeriac root (actually, technically it’s a corm, or swollen, semi-buried stem) is rounded and relatively smooth at the top end, but the base is a tangle of searching, knotted tendrils that hold on to lots of earth. When preparing it, don’t muck about with a peeler, but just set to with a large, sharp knife and cut away all the rooty bits and the skin. You’ll create a fair bit of debris – allow for losing 10-20% of its original weight by the time it’s prepared – but it’s by far the easiest way. Clean your trimmings and the peel – and the stalks and leaves, if they were still attached – because they will all add wonderful flavour to any stock. The white flesh will brown quickly when exposed to air, so add it almost straight away to water, cream, milk or a dressing.

I think the great appeal of this root lies in its curiously eager-to-please character. It’s mild enough to serve raw, yet has enough gentle pungency to hold its own in a show-stopper dish next to strong-flavoured ingredients. Celeriac is beefy enough for beef, for instance – or venison or game, for that matter – but it’s also delicate enough for chicken. In fact, a buttery, well-seasoned puree of the root is a wonderful accompaniment to any of these meats.

This vegetable loves to be in the company of other winter roots such as carrots and parsnips. It pairs especially beautifully with potato and I often combine these two in a mash or soup. You can go 50/50, but even a small amount of celeriac will intriguingly transform your mash. I cook the celeriac in milk, then blitz it and mash the resulting milky puree into the cooked spuds with a good knob of butter. Celeriac gratins – either all-celeriac or a combination of roots – are a staple in my house when the weather is cold, and I like to experiment with adding different flavours, spiking them with chilli, garlic, herbs, even lemon zest.

Don’t forget celeriac with fish, either, which can be a particularly felicitous combination. A fillet of bream or bass, fried until crisp-skinned and served with a little bacon and a creamy celeriac puree, or the mixed mash described above, is quite divine. As is a luxurious, velvet-smooth leek and celeriac soup with a poached oyster or two sitting on top. Alternatively, simply roast some cubes of celeriac with a few other roots, lots of bay leaves, thyme and garlic, then place a whole or filleted fish on top and return to the oven to complete cooking.

But some of my favourite ways to eat celeriac are completely vegetarian dishes, particularly salads. Raw and julienned (cut into fine matchsticks), it is a masterful ingredient on a platter. I often mingle it with puy lentils, flat-leaf parsley and juice-soaked raisins. It’s fantastic with fennel (their seasons overlap in October and November), as well as with fruits such as apple and orange, which can make a winter savoury salad so wonderfully aromatic and refreshing.

And then, of course, there’s the deservedly classic celeriac remoulade – thin little strips of the raw root folded into a rich, mustardy mayonnaise. Give me a dollop of that with a few cold slices of my Christmas ham and a hunk of bread, and I’m a very, very happy man indeed.


Celeriac, chicory and orange salad with toasted cashews

I love raw celeriac in a salad. Its flavour, both earthy and sweet, balances piquant, sharp or bitter ingredients beautifully. Serves four.

75g cashew nuts
2 tbsp olive oil
½ tsp English mustard
2 tsp cider vinegar
Sea salt and freshly ground black pepper
250g celeriac
1 head chicory
1 large orange

Put the nuts in a dry frying pan, toss over a medium heat for a few minutes until lightly toasted, then set aside to cool.

Combine the olive oil, mustard and vinegar with some salt and pepper, and tip into a mixing bowl. Peel the celeriac and cut it into matchsticks. Toss the julienned root immediately in the dressing to stop it from browning. Trim the chicory and separate the leaves, then add to the celeriac in the bowl. Spread the dressed celeriac and chicory on a plate.

Cut a slice off the base of the orange and stand it on a board. Use a sharp knife to cut through the peel and pith of the orange, slicing it away completely, in sections. Working over the plate of celeriac so any juice that escapes will fall on to it, cut out the individual orange segments, letting them drop on to the salad as you go. Squeeze any juice out of the remaining orange membrane over the salad. Add some more salt and pepper to taste, scatter over the cashews and serve.

Celeriac ice-cream with walnut praline

This might sound a bit wacky, but it works. Serves eight.

For the ice-cream
300g celeriac, peeled and cubed
500ml whole milk
8 large egg yolks
150g caster sugar
300ml double cream

For the praline
150g granulated sugar
75g walnut halves, roughly broken up
½ tsp flaky sea salt

Put the celeriac and milk in a large pan, bring to a simmer and cook, stirring from time to time, for 20-30 minutes, until the celeriac is tender. Using either a stick blender or a jug blender, puree the celeriac with the milk until very smooth. Measure out 300ml of the puree for the ice-cream; any leftover puree will work very well in a soup.

Whisk together the egg yolks and sugar. Pour the hot celeriac puree over the egg mixture, whisking as you go, then pour this mixture into a clean saucepan. Place over a moderate heat and cook, stirring continuously, until thick enough to coat the back of a wooden spoon. Pour the mixture into a bowl, stir in the cream and put a piece of cling-film over the surface to stop a skin forming. Set aside to cool, then chill. When completely cold, churn in an ice-cream machine (you’ll need one with a 1.5-litre capacity for this amount of custard) until soft-set, then freeze until solid. Transfer to the fridge for 30 minutes or so before serving, to soften a little.

To make the praline, lightly oil a baking sheet (or line it with baking parchment or a nonstick baking mat). Put the sugar in a heavy-based saucepan with a light-coloured interior to make it easier to see the colour of the caramel.

Put the pan over a low heat and, stirring with a rubber spatula from time to time, wait until the sugar melts. Stop stirring now and let the sugar cook until it has turned a dark amber colour.

As soon as it reaches the right shade, remove from the heat, stir in the walnuts with a fork and immediately pour on to the prepared sheet. Sprinkle the salt over the top and leave to set. When set, chop or break into small pieces. Store in an airtight container until needed.

To serve, divide the ice-cream between eight small dishes or glasses and add a liberal scattering of walnut praline.

Potato, pear and celeriac gratin

The very talented Sophie Wright made a lovely version of this in my new Channel 4 show, Hugh’s Three Good Things. The addition of pears enhances the celeriac’s sweet, aromatic quality. Serve with something hearty, such as slow-cooked shoulder of lamb or pork. Serves six as aside dish.

1 knob butter
About 400g floury potatoes
About 400g celeriac
2 firm, medium pears (about 300g)
Salt and freshly ground black pepper
400ml double cream
100ml whole milk
1 clove garlic, peeled and halved
1 bay leaf
1 good grating nutmeg

Heat the oven to 170C/335F/gas mark 3. Rub a gratin dish with the butter.

Peel the potatoes and slice them thinly, either with a sharp knife or a mandoline. Cut the outer layer off the celeriac and slice this thinly, too. Peel, quarter and core the pears, and slice each quarter thinly lengthwise. Combine the vegetables and pear in a bowl, season and toss. Arrange the mixture in the gratin dish, pressing it as flat as possible so there are not too many gaps and air pockets.

Put the cream and milk in a saucepan with the garlic halves, the bay leaf, the nutmeg and plenty of salt and pepper, and heat until just below boiling. Pour over the veg in the dish (take the bay leaf out at this stage, but keep the garlic in).

Bake for an hour and a quarter to an hour and a half. The gratin is ready when the top is golden and bubbling, and a small, sharp knife easily pierces the vegetables all the way through. You may want to turn up the heat to 190-200C (gas mark 5 or 6) for five minutes at the end for a bit of extra bubbling crispness. Leave to rest and cool for five minutes or so before serving.

• River Cottage cookery courses and dining events are available as Christmas gifts – go to rivercottage.net for details.

Hugh Fearnley-Whittingstall: Celeriac, chicory and orange salad

Hugh Fearnley-Whittingstall’s celeriac, chicory and orange salad with toasted cashews: Earthy and sweet. Photograph: Colin Campbell for the Guardian.

Drink one beet, one carrot, one apple, and maybe lemon or lime…

MIRACLE DRINK “KILLS CANCER CELLS” (MUST READ)

340 15695 110 33 52 18025 Share

Natural Cures Not Medicine on Facebook: www.facebook.com/naturalcuresnotmedicine

MIRACLE DRINK … “KILLS CANCER CELLS”…..MUST READ :

This “MIRACLE DRINK” has been circulating for a long time. It is worth your while to take note. There is a celebrity Mr. Seto who swears by it. He wants to make it public to draw the attention of people who have cancers. This is a drink that can protect bad cells forming in your body or it will restrain its growth! Mr. Seto had lung cancer. He was recommended to take this drink by a famous Herbalist from China. He has taken this drink diligently for 3 months and now his health is restored thanks to this drink! It can’t hurt to try!

It is simple. 
You need one beet root, one carrot and one apple that combine together to make the JUICE!

Wash the above, cut with the skin on into pieces and put them into the juicer and immediately you drink the juice. You can add some lime or lemon for more refreshing taste.

This Miracle Drink will be effective for the following ailments:
1. Prevent cancer cells developing. Restrain cancer cells growing further.
2. Prevent liver, kidney and pancreas disease. (Reported to also cure ulcers.)
3. Strengthen the lungs, prevent heart attack and high blood pressure.
4. Strengthen the immune system .
5. Good for eyesight, eliminate red, tired eyes or dry eyes.
6. Help eliminate pain from physical training, muscle ache.
7. Detoxify, assist bowel movement, eliminate constipation. Therefore it will make skin healthy and look more radiant.
8. Improve bad breath due to indigestion, throat infection,
9. Great for preventing and killing acne problems.
10. Assist Hay Fever Sufferer from Hay Fever attack.

There should be no side effect, highly nutritious and easily absorbed. It’s very effective if you need to lose weight. You will notice your immune system will be improved after a 2 week routine. Drink immediately from the juicer for best effect.

PLEASE SHARE TO YOUR FAMILY AND FRIENDS.

Read more at http://www.naturalcuresnotmedicine.com/2013/08/miracle-drink-kills-cancer-cells-must-read.html#9q06ASkI5WyiBkP7.99

Blueberry & Chocolate Chip Pumpkin Loaf

 Prep time:  
Cook time:  
Total time:  
Serves: 4-5

Ingredients

  • 1 medium banana (the browner, the better)
  • ¼ cup pureed pumpkin (I used canned Pure Pumpkin)
  • ¼ cup blueberries
  • ⅛ cup Enjoy Life Chocolate Chips or dark chocolate chips
  • 1.5 cups roasted unsalted cashews
  • 1 cup almond meal/flour
  • 2 tablespoons walnut oil
  • 2 eggs, whisked
  • 1 tablespoon raw honey
  • 1 teaspoon baking soda
  • 1 teaspoon baking powder
  • 1 teaspoon vanilla extract
  • ½ teaspoon cinnamon
  • pinch of salt


Instructions
  1. Preheat oven to 375 degrees.
  2. Pull out your handy dandy food processor. It will make life soooo much easier. Add your cashews to the food processor to grind down.
  3. Once your get a fine cashew meal, add your walnut oil while your food processor is still on until you get a cashew butter.
  4. Then add your peeled banana and pureed pumpkin to your food processor with your cashews. Turn your food processor on and let combine for a minute or so until you have a soupy paste. Taste it. It’s stupid delicious.
  5. Now in a large bowl, whisk your eggs, then add your cashew/banana mixture along with almond meal/flour, baking soda and powder, honey, vanilla extract, cinnamon, and salt. Mix to combine until you get a batter.
  6. Now fold in your blueberries and chocolate chips.
  7. Grease a bread pan with some coconut oil. I used a loaf pan that was 9.3×5.2 inches (weird numbers) and it worked well. You could use smaller for taller loaf of bread, just may cook differently.
  8. Pour batter into your greased loaf pan. Place in oven and bake for 25-30 minutes or until bread is cooked through and the top of your loaf has a bit of a “crisp” to it.
  9. Let bread cool for about 10 minutes.


Notes
Be careful how many blueberries you add, it can get a bit too moist if you’re not careful.

APPLE Cinnamon Water ::: from ::: Raw for Beauty.com

1000340_441572022618141_1986652798_n

Boost your metabolism naturally with this ZERO CALORIE Detox Drink. Put down the diet sodas and crystal light and try this out for a week. You will drop weight and have
TONS ON ENERGY! Sounds yummy!
1 Apple thinly sliced
1 Cinnamon Stick

Drop apple slices in the bottom of the pitcher and then the cinnamon sticks, cover with ice about 1/2 way up then add water.